Transcript
MODULE 3
A. Separatory Extraction at MIT
Reaction Work-Up I: Extracting, Washing, Drying
-7782187126100It is very rare for a chemical reaction to provide only the one compound that you're looking for. Even highly selective reactions generate the desired product as a crude mixture, containing byproducts and underreacted starting materials and reagents.
Liquid-liquid extraction is the most common technique for separating a compound from a complex mixture. In an extraction, you can take advantage of differing solubilities to selectively separate the different components. By carefully planning out an extraction and washing sequence, otherwise known as a work-up, the desired product can usually be separated from the unwanted impurities.
In an ideal world, each chemical reaction in the laboratory would provide only the desired product in its pure form. In reality, the product is almost always generated as part of a messy mixture of byproducts and side products. In short, garbage.
Liquid-liquid extraction is a useful technique used to isolate the desired compound from a complex mixture.
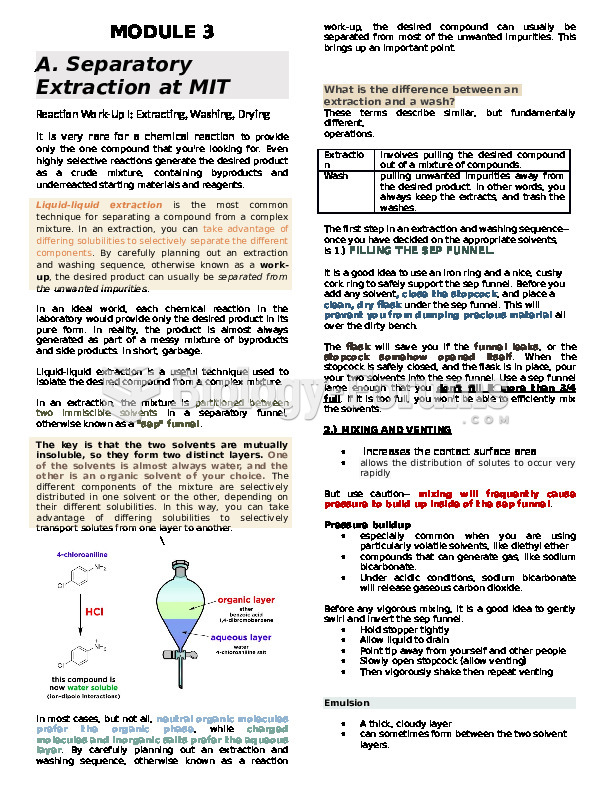
In an extraction, the mixture is partitioned between two immiscible solvents in a separatory funnel, otherwise known as a "sep" funnel.
-7782110788200
The key is that the two solvents are mutually insoluble, so they form two distinct layers. One of the solvents is almost always water, and the other is an organic solvent of your choice. The different components of the mixture are selectively distributed in one solvent or the other, depending on their different solubilities. In this way, you can take advantage of differing solubilities to selectively transport solutes from one layer to another.
\
In most cases, but not all, neutral organic molecules prefer the organic phase, while charged molecules and inorganic salts prefer the aqueous layer. By carefully planning out an extraction and washing sequence, otherwise known as a reaction work-up, the desired compound can usually be separated from most of the unwanted impurities. This brings up an important point.
What is the difference between an extraction and a wash?
These terms describe similar, but fundamentally different,
operations.
Extraction
involves pulling the desired compound out of a mixture of compounds.
Wash
pulling unwanted impurities away from the desired product. In other words, you always keep the extracts, and trash the washes.
The first step in an extraction and washing sequence--
once you have decided on the appropriate solvents,
is 1.) FILLING THE SEP FUNNEL.
It is a good idea to use an iron ring and a nice, cushy cork ring to safely support the sep funnel. Before you add any solvent, close the stopcock, and place a clean, dry flask under the sep funnel. This will prevent you from dumping precious material all over the dirty bench.
The flask will save you if the funnel leaks, or the stopcock somehow opened itself. When the stopcock is safely closed, and the flask is in place, pour your two solvents into the sep funnel. Use a sep funnel large enough that you don't fill it more than 3/4 full. If it is too full, you won't be able to efficiently mix the solvents.
2.) MIXING AND VENTING
increases the contact surface area
allows the distribution of solutes to occur very rapidly
But use caution-- mixing will frequently cause pressure to build up inside of the sep funnel.
Pressure buildup
especially common when you are using particularly volatile solvents, like diethyl ether
compounds that can generate gas, like sodium bicarbonate.
Under acidic conditions, sodium bicarbonate will release gaseous carbon dioxide.
Before any vigorous mixing, it is a good idea to gently swirl and invert the sep funnel.
Hold stopper tightly
Allow liquid to drain
Point tip away from yourself and other people
Slowly open stopcock (allow venting)
Then vigorously shake then repeat venting
Emulsion
A thick, cloudy layer
can sometimes form between the two solvent layers.
colloidal mixture of the two solvents, and is frequently caused by the presence of fine particles in the solution.
Getting rid of an emulsion can take some time, so if you know that you are likely to generate one, your best bet is to take pains to prevent it ahead of time. {Gently shaking]
DEALING WITH AN EMULSION (after it forms)
1. Sit and wait
2. Swirl and Stir
3. Add several ml of saturated sodium chloride sol’n and swirl to mix
*SODIUM CHLORIDE: increases ionic strength of the aqueous layer and decreases the solubility of the organic solvent in the water
4. Vacuum Filtration
WHICH LAYER ON TOP OR BOTTOM????
* Density of the solvents
* Solvent with the lowest density will be on top
* Solvent with highest density will be on the bottom
SOLUBILITY TEST:
AQUEOUS LAYER
ORGANIC LAYER
soluble
not cloudy
insoluble layer on the bottom or top
cloudy
do not discard any of the layers until you are absolutely sure that you have isolated all of the material.
5. Separation of Layers
Before you do anything, place a clean, dry labeled beaker
under the sep funnel, and remove the stopper. If you don't do this, you'll have some trouble getting any liquid to drain.
With the stopper off, open the stopcock, and allow the bottom layer to drain into the beaker. Take it slow when you get near the interface, so that you can close the valve precisely in between the two layers. Once you have drained the bottom layer, you have a few options.
If you still need to perform a wash or an extraction
with the top layer, then leave it in the funnel.
Pour in the second solvent, and proceed to mix and vent.
If you are done with the top layer, then pick up the funnel,
and pour it into a second clean, dry labeled beaker.
Sep funnel etiquette to follow:
always drain the bottom layer through the stopcock, and pour the top layer through the top. This will minimize recontamination of your material.
PLANNING THE WASHES:
use what you know about the impurities to decide on appropriate aqueous washes for your mixture.
washes should only be 10% to 50% of the volume of the solution that you are washing.
And make sure to repeat each wash two or three times to wash away as much of the impurities, as possible.
Your crude mixture contains acetic acid, a fairly strong acid, and two weak bases-triethylamine and DMAP.
To get rid of the acetic acid, you need to wash the solution with a mild base that will deprotonate the acid and pull the charged acetate ion into the aqueous layer. Saturated sodium bicarbonate works very well for this purpose.
To get rid of the weak bases--triethylamine and DMAP-- you need to wash with a dilute solution of a strong acid that will protonate the bases and pull them into the aqueous layer. A 10% aqueous solution of HCL works well for this. Once again, add the wash, and mix and vent well. Drain the aqueous layer containing the protonated amines, and repeat two more times.
*Water slightly soluble to ether to wash it out = wash it with saturated sodium chloride as the high ionic strength of the salt solution decreases the solubility of the aqueous layer in the ether, effectively washing away some of the water.
6. Drying the Organic Layer
Magnesium Sulfate (MgSO4)
fine powder
slightly acidic
*Add more drying agent, and swirl until you get SNOW GLOBE effect -> free unclumped powder
Sodium Sulfate (NaDO4)
Slower than MgSO4
Neutral
Granular: absorb less of desired material unto surface
To remove, perform gravity filtration
7. Concentrating In Vacuo
B. Thin Layer Chromatography
Identify components of a mixture
assess the purity of a sample
monitor both reactions and purifications
TLC plates
Polar absorbent (silica or alumina)
Solid support (plastic or glass)
Fluorescent powder
Glass spotter: used to apply sample to TLC plate
Micropipets: conveniently commercially available
TLC spotters| prepared by heating and pulling capillary tubes or disposable Pasteur pipets.
Making own spotters = thinner
Once a TLC plate has been spotted with a sample, it is developed in a developing chamber that can easily be assembled from a glass jar with a lid, a piece of filter paper, and 5 to 10 milliliters of an appropriate developing solvent.
Before you get started, make sure you also have a pair of tweezers, a pencil, and a ruler.
STEP 1 | DEVELOPING CHAMBER (Putting It Together)
Assembly in the developing chamber:
1. Slide the filter paper into the jar so that it is flat against the wall.
2. Pour in approximately 8 millimeter layer of the appropriate developing solvent into the jar.
3. Tilt the jar to moisten the filter paper and close the lid to prevent evaporation.
4. You should end up with a layer of solvent no more than 5 to 8 millimeters deep.
5. The moist filter paper ensures that the air in the chamber is saturated with solvent vapor. It prevents evaporation of solvent from the TLC plate during development.
Before you start, there are a few things to remember.
Always use a pencil and never a pen to mark your TLC plates.
Ink is soluble in organic solvents and will be developed along with your sample.
Make sure that you always mark and spot your sample on the dull and not the shiny side of the TLC plate.
Remember, the dull side is coated with the adsorbent.
Even though you should be wearing gloves while handling TLC plates, it is important that you do not touch the face of the plate with your fingers. (ONLY TOUCH THE EDGES)
Oils from your skin or other contaminants can adsorb to the plate and affect your results.
Before you can apply your sample to a TLC plate, it is important to mark the plate so that you can keep track of where the sample is applied.
STEP 2a | MARKING THE PLATE
Before you can apply your sample to a TLC plate, it is important to mark the plate so that you can keep track of where the sample is applied.
One way to do this is to draw a straight line approximately 1 centimeter from the bottom of the plate.
Draw small ticks through the line at each point where you will apply a spot of sample.
It is important that the spots are NOT TOO CLOSE to the edge of the plate, or evaporation from the sides of the plate will result in inconsistent results.
!!! NOT TOO CLOSE TOGETHER!!!
STEP 2b | SPOTTING THE PLATE
Apply the right amount of sample in a small enough spot.
Your TLC sample should be fairly dilute, containing approximately 1% to 2% of the desired compound.
If the sample is too dilute
you will not be able to visualize the spots.
If the sample is too concentrated
you will observe large streaky spots on your final plate.
To spot the plate, dip the glass spotter into the sample and touch it lightly and quickly to the plate.
Wait briefly for the solvent to dissolve before spotting again.
Generally, 1 to 3 spots will suffice.
It is crucial that you do not leave the spotter on the plate for too long, or you will end up with large diffuse spots.
It's difficult to separate mixtures on a TLC plate
when the spots are too big.
Try to keep the spots 1 to 2 millimeters in diameter. The smaller, the better.
Once you have applied your sample and the spots have dried, it's time to develop the plate.
STEP 3 | DEVELOPING THE PLATE
Using your tweezers, pick up the plate and place
it in the developing chamber.
*Make sure that the solvent level is below the spots on the plate, otherwise you will end up with your sample dissolved in the developing solvent.
Replace the cap to prevent evaporation of solvent off of the plate, and try not to let the edges of the plate touch the filter paper. This will disturb the capillary motion of the solvent on the plate.
Keep a close eye on the solvent front.
Do not let the solvent get closer than 5 to 10 millimeters from the top of the plate.
When the solvent front gets too close to the top, evaporation from the top of the plate becomes a problem.
The spots keep moving up the plate, but the solvent front appears to stop. This leads to incorrect Rf values.
When the solvent front has reached an appropriate height,
remove the plate and immediately draw a line at the solvent front. This line will be necessary for the calculation of Rf values.
STEP 4 | VISUALIZING THE SPOTS
When the compound of interest is brightly colored, no extra steps need to be taken to visualize the spots. However, most organic compounds are colorless and cannot be seen on a TLC plate with the naked eye.
Fortunately, most TLC plates contain an additive that causes the plates to fluoresce under ultraviolet light.
Certain UV active compounds are capable of quenching
this fluorescence.
As a result, they appear as dark spots on the glowing TLC plate. UV lamps such as this one are commonly found in laboratories for just this purpose.
Just place your plate under the lamp, turn it on, and mark the spot with a pencil.
A number of TLC stains have also been developed to aid
in the visualization of spots that cannot be seen under a UV
light.
You can watch the advanced thin layer chromatography
video for a demonstration of a few of these staining
procedures.
TLC data is described in terms of Rf values.
Under a specific set of conditions, a particular compound should always exhibit the same Rf.
STEP 5 | CALCULATING Rf VALUES
Let's quickly run through the procedure for calculating an Rf value. Under a specific set of conditions, a particular compound should always exhibit the same Rf.
First, measure the distance from where the spot started on the plate to where it ended up.
Always measure from the center of the final spot.
We'll call this distance A. Next, measure the distance
from where the spot started to where the solvent front ended up. We'll call this distance B. Do not measure from the bottom of the plate. This is a common mistake that will
lead to incorrect Rf values.
The Rf value is defined as the ratio between the distance the spot moved, A, and the distance the solvent moved, B.
This value is dependent on the polarity of the compound and the polarity of the developing solvent. Polar compounds will have lower Rf values than nonpolar compounds under the same developing conditions.
This series of plates illustrates the effect of solvent polarity on Rf. As the polarity of the developing solvent is increased from left to right, the spot moves further up the plate. The value of A gets larger while the solvent front, B, stays the same.
Increasing the polarity of the developing solvent
generally increases the Rf values of all of the spots.
It is a good idea to use a developing solvent that gives you Rf values between 0.2 and 0.8. This will generally give you the most effective separation when you have more than one compound in your sample.
For example, a mixture of two compounds was spotted and developed in hexanes, a nonpolar solvent. The final plate shows only one spot with a very low Rf.
The same mixture was developed in ethyl acetate, a polar solvent, and once again, the final plate shows only one spot, this time with a very high Rf.
When a mixture of hexane and ethyl acetate was used as a developing solvent, the two spots were resolved. Notice that both spots are near the center of the plate. TLC is frequently used to compare the identity of two compounds.
COMPARING TWO COMPOUNDS
In a perfect world, TLC data would be consistent from plate
to plate and chamber to chamber.
Unfortunately, small deviations in development conditions
affect the observed Rf values.
As a result, it is most convincing to compare Rf values of different samples on the same TLC plate. For example, you know that the unknown sample marked with a question mark consists of either compound A, compound B, or a mixture of the two.
You can use TLC to determine the identity of the unknown.
You will need two TLC plates.
Make three marks on the first TLC plate, one for the unknown, one for A, and one in the center for the co-spot.
Do the same with the second plate, except substitute B for A.
On the first plate, spot compound A on the center mark and one of the side marks, and allow both spots to dry well.
Drain the excess liquid from the spotter onto a paper towel.
And rinse your spotter in clean solvent before switching to a different sample.
Now, spot the unknown mixture on the center mark and the other side mark of the first plate.
Repeat this procedure with compound B on the second plate, and develop both plates.
Now, compare the two plates.
You can see that the co-spot with A shows two distinct spots while the co-spot with B shows only one.
These results indicate that the unknown sample contains only compound B.
SUMMARY:
1. Developing Chamber
2. Marking & Spotting Plate
3. Develop Plate
4. Visualizing Spots (UV)
5. Calculating Rf Values
Choose a Developing Solvent
Comparing Two Compounds (Co-Spotting)
C. Column Chromatography
The purification of chemicals is one of the most important jobs
of a research chemist. Perhaps the most common purification technique in an organic laboratory is column chromatography. This technique takes advantage of the different polarities of different compounds to separate mixtures, frequently on the grand scale. Technically, carbon chromatography can be challenging, but with a little practice, you will be able to separate mixtures of compounds consistently and successfully.
As the name suggests, a column of adsorbent, either silica
or alumina, is packed into a glass tube
with a stopcock at the bottom.
The sample is applied to the top of the adsorbent and solvent is run through the column until the compound is flushed out of the bottom.
In most cases, flash column chromatography is used, meaning that pressure is applied to the top of the column, resulting in faster running times and better separation.
STEP 1 | CHOOSING A SOLVENT SYSTEM
Before you can run a column, you need to decide on the appropriate conditions.
It is vital that you pick a solvent system that will provide good separation.
In general, you will use a mixture of two miscible solvents, one polar and one nonpolar.
Make a TLC sample by dissolving a small amount of your material in approximately 1 milliliter of solvent. Use this sample to spot several TLC plates, and develop each plate in a different solvent system. Make sure that the adsorbent on your TLC plates is the same as the adsorbent you will
use in the column, either silica or alumina.
-26007118441
Most commonly, you will use a solvent system composed of a mixture of ethyl acetate and hexane.
-78829-6555800But when you are purifying a volatile compound,
it is a good idea to use a lower boiling solvent system,
such as a mixture of ether and pentane.
-79513619540
Mixtures of methanol and dichloromethane are frequently used to purify highly polar compounds.
When you are removing small amounts of impurities from a sample, focus on the major constituent.
Once you have found a solvent system that separates the components of your sample, adjust the polarity so that the major, and hopefully the desired constituent, has an Rf of approximately 0.3.
If the Rf is too low, then the solvent system is too nonpolar,
and it will take a very long time for the material to come off of the column.
Alternatively, if the Rf is too high, then the solvent system is too polar, and the material will come off of the column very quickly with poor separation.
When you are separating a mixture of two or more compounds, adjust the solvent polarity such that the midpoint between the spots is at an Rf of approximately 0.3.
When you are separating two or more compounds with very different polarity, it will save you time to increase the polarity of the solvent as the column proceeds.
Begin the column with a solvent system that puts the least polar compound at an Rf of approximately 0.3.
Once that compound has completely come off of the column, slowly increase the polarity of the solvent to a mixture that puts the next spot at an Rf of 0.3.
Continue this until all desired spots have come off of the column.
STEP 2a | CHOOSING QUANTITY OF ADSORBENT
Once you have picked an appropriate solvent system,
you need to decide how much adsorbent to use.
This video will illustrate the use of a silica gel column,
but the same procedure can be followed using alumina.
-19878-215300Caution
Silica and alumina are highly toxic when inhaled.
Handle adsorbents in the hood.
In cases with good separation, a 20 to 1 mass ratio of silica gel to compound is usually adequate.
This means that for 1 gram of compound, you would use 20 grams of silica.
It is good to use as little adsorbent as possible, but when the separation is more difficult, ratios of 50 or 100 to 1 may be necessary.
Choosing the appropriate amount of adsorbent takes practice. Until you have developed your own intuition, it is a good idea to ask a more experienced chemist for advice.
Weigh the silica into an Erlenmeyer flask in the hood.
Use a flask large enough that you don't fill it more than one third full.
STEP 2b | CHOOSING COLUMN DIAMETER
The last major decision to make is what diameter of column
to use.
Different people have very different opinions about this,
but in general, it is a good idea to choose a column that will fill 6 to 7 inches with the chosen amount of silica.
In a taller column, the different bands of compounds
will disperse and overlap. But a shorter column will not have enough surface area to give good separation.
STEP 3 | PACKING THE COLUMN
1. The first step involves plugging the bottom of the column with a small piece of cotton to prevent loss of silica gel.
Roll a small piece of cotton between your fingers, and drop it into the column.
2. Tilt and tap the column until the cotton settles
into the center depression.
3. Using a long stick, gently pack the cotton into the hole.
4. Don't pack the cotton too tightly, or it will be difficult to force solvent through the plug.
5. To continue packing the column, you will need an empty beaker, a pipet, a supply of your chosen solvent mixture,
a funnel, your pre-weighed silica gel, some sand, and a flash pressure apparatus.
With the cotton in place, clamp the column in a straight vertical position, and use a funnel to pour in a small layer of sand, approximately 1 to 2 millimeters.
Now, fill the column with approximately 5 inches of solvent mixture. Make sure that the sand layer is flat and no sand is stuck to the sides. Pour enough of the solvent mixture into the silica gel to form a mobile slurry.
Swirl the silica, and carefully pour it into the column, making sure that you do not disturb the sand layer. Use additional solvent to add the remaining silica.
Once you have added all of the silica, rinse the funnel and sides of the column with a small amount of solvent. Apply pressure to the top of the column and open the stopcock, tapping the sides of the column gently to make sure that the silica layer is flat.
Drain the solvent until two or three inches remain above the silica layer. Then close the stopcock and remove the pressure.
left11664700
Caution
Make sure there are no bubbles before you add sand.
Bubbles and inconsistencies in your column will cause serious problems later.
To avoid bubbles, use a very wet flurry of silica gel. Gently tap the sides of the column while packing the silica, and apply pressure before opening the stopcock.
When you have achieved a uniform layer of adsorbent, use a pipet to rinse any excess silica down from the sides of the column.
Using the funnel, carefully add a small layer of sand. Be careful not to disturb the top of the silica gel. Use a small amount of solvent to wash the excess sand from the sides of the column.
Apply pressure, open the stopcock, and drain the solvent to just above the silica gel.
-795138531100
Caution.
Never let the solvent layer drop below the top of the column.
STEP 4 | LOADING THE SAMPLE
Now you're ready to load your sample onto the column.
There are a couple of ways to do this.
Method 1: Wet-Loading
If your sample is soluble in the chosen solvent system,
then it is easiest to load your sample as a solution.
Dissolve your sample in the smallest possible volume
of the chosen solvent mixture. If you have trouble getting it to dissolve, try adding a few drops of methylene chloride.
It is vital that your sample is completely dissolved before you add it to the column.
Slowly drip the solution of sample around the edges of the column, being careful not to disturb the sand layer. Lower the solvent level to just above the silica. Rinse the flask with a small amount of solvent, and add the rinse in the same fashion.
Lower the solvent level again, and repeat the rinse one or two times. It is a good idea to rinse any residual sample from the sides of the column, lowering the solvent level in between each rinse.
Now you're ready to fill the column with solvent. Start by slowly adding solvent with a pipet. Once you have added a nice cushion, slowly pour the remaining solvent into the column, being careful not to disturb the sand or the silica. Done correctly, you should end up with a thin band of sample
just below the sand.
Method 2: Dry-Loading
When your sample is largely insoluble in the chosen solvent mixture, it is more effective to pre-adsorb the sample onto a small quantity of silica and add it as a dry mixture.
To do this, you will need some methylene chloride, a round-bottom flask, and some silica gel. Start by dissolving your sample in methylene chloride and transferring it to the round-bottom flask. Make sure you complete the transfer with a few rinses.
Then add a small amount of silica gel to the flask, and swirl to mix. Before you can remove the solvent on the rotovap, stuff a few chem wipes into the bump trap to prevent contamination of the rotovap with the very fine silica powder.
Attach your flask to the bump trap, and concentrate it on the rotovap until you obtain a fine, free-flowing powder.
If the mixture remains clumpy or sticky, you may need to re-dissolve the sample and add more silica gel.
Don't add it to your column until it is a free-flowing powder.
To dry load your sample, pack the column as before, but leave a small layer of solvent above the sand. Pour the pre-adsorbed silica onto the top of the sand. Use a small amount of the solvent mixture to rinse the flask, and wash the silica down from the sides of the column. Drain the solvent to the top of the silica, and add a small layer of sand.
Carefully fill the column with solvent, as before. One alternative to dry loading is loading your sample as a solution in a solvent that is more polar than the solvent system you're using for your column. You will end up with a thick band of compound and poor separation.
STEP 5 | RUNNING THE COLUMN
Once your sample is loaded on the column, you must begin running it immediately, and it's a good idea not to take any breaks until it's through.
Before you start, make sure you have an adequate supply of your chosen solvent mixture and a nice, big rack of test tubes. Begin running the column by placing a test tube
at the bottom of the column, applying pressure to the top,
and opening the stopcock.
If the pressure is right, you should have a fairly rapid flow of solvent out of the bottom of the column.
You may have to adjust the pressure so that the flow rate isn't a slow drip or an out-of-control stream, but something right in the middle.
Don't forget to continually collect the eluant in test tubes. You have to pay attention so that the solvent doesn't
overflow.
358432112763500
Caution.
Pay close attention to the solvent level and refill frequently.
STEP 6 | MONITORING THE COLUMN
When your compound is colored, it can be easy to find it in the fractions. But a more reliable method for monitoring your column is with TLC. You can easily spot five or six fractions per TLC plate.
Make sure you rinse your spotter in between fractions.
Develop the plates with a solvent mixture that spreads
the spots out on the plate.
It does not have to be the same solvent system
you use for the column. If it goes well, you will end up with a maximum of one compound per fraction, with a few clean factions in between the compounds you're trying to separate.
Unfortunately, it doesn't always work out so well.
Overlapping fractions containing more than one compound
are the sign of a failed separation.
-63246-63246If all of the material elutes in just a few fractions,
then the column may have been too small or the developing solvent too polar.
On the other hand, if the compounds are spread out over many fractions, then the column may have been too tall or you used too much solvent to load your sample.
STEP 7 | COMBINING FRACTIONS
Once the last compound has come off of the column
and you have analyzed your TLC plates, it is time to combine the desired fractions.
Combine all of the fractions containing the same pure compound in a round-bottom flask.
Fractions containing more than one compound should be set aside for further purification.
It is a good idea to rinse the test tubes two or three times with a little bit of clean solvent and add those rinses to the flask as well.
Don't fill the flask more than half full.
Remember, you need to concentrate it on the rotovap.
Removing solvent from your compound is the last step in a chromatographic purification.
-13639812598400
Caution.
Never discard any fractions until you recover the desired material.
STEP 8 | CLEANING UP
It is a good idea to clean up the silica before you discard it in the appropriate waste container.
When you are sure that there is no more desired material on the column, fill the column with ethanol, place a flask underneath, and push air through the column until the silica is dry and free-flowing.
At this point, it will be easy to discard the silica by pouring it into the proper waste container.
When you need to purify a small amount of compound, it is sometimes easier to run a micro-column in a pipet.
On small scale, the packing and sample loading steps are greatly simplified.
It is easiest to pack a micro-column completely dry without any solvent.
Plug the end of the pipet with a small piece of cotton.
Then add a couple of inches of adsorbent and a thin layer of sand.
Next, add your sample, pre-adsorbed onto a small amount of adsorbent.
Top it off with a thin layer of sand, and you're ready to go.
To run the column, place a collection flask or a test tube underneath the pipet, and use another pipet to add solvent to the top of the column.
Keep adding solvent until your compound has come off of the column.
Make sure you don't let the column run dry.
D. Simple &
Fractional Distillations
While working in the laboratory, you will often be required to separate liquid mixtures or to purify liquid from non-volatile substances.
This separation and purification can be done by utilizing the liquid's boiling point through a technique called distillation. Distillation works through the processes of vaporization and condensation.
Vaporization
transformation of a liquid to a gas
Condensation
conversion of a gaseous species into a liquid.
To perform a distillation, a mixture of two miscible liquids
is heated until the liquid with the higher vapor pressure reaches its boiling point.
This vapor travels up the inside of the flask, through a distilling head, and into a condenser. The cold water jacket on the condenser transforms the vapor back into liquid, which then travels into the receiving flask.
In this manner, distillation effectively separates lower boiling point compounds from higher boiling point compounds.
THREE TYPES OF DISTILLATIONS
Depending on your liquid solution, you will have to decide which type of distillation will be the most effective.
Simple distillation
This technique is used when separating miscible liquids that boil below 150 degrees Celsius at 1 atmosphere from either non-volatile impurities or from a second liquid that boils at least 25 degrees Celsius higher than the first.
Fractional distillation
This technique should be used to separate liquid mixtures that have less than a 25 degree Celsius difference in boiling point.
Vacuum distillation
This technique should be used to separate miscible liquids that boil above 150 degrees Celsius at 1 atmosphere.
To carry out a simple distillation,
you will need a cork ring, a round bottom distilling flask, two ring stands, a stir bar and magnetic stirrer, a distilling head, a condenser, a vacuum adapter, grease, 3 yellow keck clamps, a thermometer and thermometer adapter, 3 round bottom receiving flasks, 2 extension clamps and fasteners, a heating mantle, an iron ring, a variable voltage transformer, or Variac; 3 hose clips, 2 pieces of rubber tubing, and a container for an ice water bath.
The first step in performing a distillation is choosing the proper sized distillation flask.
The distilling flask should not be more than 1/2 full
or less than 1/3 full when the distillation begins. If the flask is overfilled, the solution will likely overheat or bump into the condenser.
Bumping will cause impurities to be collected in the receiving flask, rendering the distillation worthless.
If the flask is less than 1/3 full, then you'll have a greater chance of losing some product because a substantial amount of the material will be needed just to fill the flask
and distilling head with vapor.
While we're on the topic of size, we'd like to speak briefly about heating mantles.
TOO SMALL
Never use a heating mantle that is too small because heat
is not easily transferred between the mantle
and flask due to poor contact, which
causes the mantle to burn out.
TOO BIG
If you do not have an appropriately sized heating
mantle, then use one that is too big.
If the mantle is too big for the flask,
then add sand to fill in the empty space
.After you have chosen a distilling flask, transfer your sample into it and add an appropriately sized stir bar. If you will not have access to a magnetic stirrer, then add a few boiling stones to the distilling flask instead.
The next step is the assembly of the distillation apparatus, which is likely one of the most difficult glassware assemblies you'll ever encounter.
The neck of the distilling flask is clamped onto one of the ring stands with an extension clamp and fastener.
A heating mantle, which is plugged into the Variac, rests on an iron ring below the distilling flask.
If you're using a stir bar, then place a magnetic stirrer
underneath the heating mantle. Leave enough room below the iron ring so that the heating mantle can be dropped away
from the distilling flask if necessary.
The distilling head is attached to the top of the distilling flask, and a condenser is attached to the side arm of the distilling head. The vacuum adapter is attached to the other end of the condenser, and this joint is attached to the second ring stand with an extension clamp and fastener.
A small receiving flask is clamped to the vacuum adapter with the yellow keck clamp, and an ice water bath is placed underneath. The thermometer and thermometer adapter are attached to the top of the distilling head and clamped in place with the green keck clamp.
The top of the thermometer bulb should be aligned with the bottom of the side arm on the distillation head. Yellow keck clamps are used to secure both ends of the condenser. Rubber tubing is attached to the water inlet and outlet of the condenser and secured with hose clips.
Finally, place 2 clean, dry receiving flasks near the distillation apparatus.
Before continuing, confirm that all of the joints have been lightly greased and that no keck clamps are used on any joint that will become hot.
After assembling the distillation apparatus,
attach the tubing at the bottom of the condenser
to the water source, place the end of the tubing
at the top of the condenser into a sink.
REMEMBER, WATER GOES IN AT THE BOTTOM AND OUT AT THE TOP TO DISCOURAGE THE FORMATION OF AIR BUBBLES.
Double check that all of the joints are secured with hose clips and start the water flow.
The water should flow at the slowest rate that is necessary to keep the condenser cold.
If the flow rate is too fast, the chance of the tubing popping off the condenser and spring all over your workspace greatly increases.
To perform this simple distillation, turn on the Variac and heat the sample to a gentle boil.
Make sure that the vacuum adapter remains to the air.
Never heat a closed system, or it will explode.
A ring of condensate will move up the flask and into the distilling head. When the vapor reaches the height of the thermometer bulb, the temperature reading will jump dramatically, indicating the formation of a droplet of liquid
on the thermometer bulb.
If the condensate ring completely stops rising at any point, slightly increase the setting on the Variac.
After the vapor reaches the condenser, it transforms back into liquid, flows down the condenser and into a small receiving flask.
When approximately 10 drops have been collected in the small receiving flask, quickly replace it with the larger one.
The first couple of drops of a distillation are always discarded because they may contain some lower boiling impurities.
At this point, the distillate should be dropping into the receiving flask at a rate of 10 drops per minute.
If the rate is faster, then the heat is too high, and higher boiling point impurities may have escaped into the receiving flask.
If the rate is too slow, then the distillation will occur over too long of a time period.
After the lower boiling liquid has been completely distilled, no drop of liquid will be on the thermometer bulb, and the temperature will plunge dramatically.
At this point, immediately replace the large receiving flask with a new, small receiving flask to collect the last few drops of liquid. These drops may contain some higher boiling impurities that should not be collected in the main receiving flask.
Record the temperature range of when the mixture first started to boil until right before the dramatic drop in temperature.
This is the boiling point of the distillate. If the range is within 2 degrees Celsius, your distillate is fairly pure. After you have collected the final few drops of liquid, turn off the heat source.
A simple distillation is performed more effectively if certain guidelines are followed.
Ensure all the joints on the apparatus are tight and that the water lines are secured.
Fill the distilling flask between 1/3 and ½ full prior to distillation.
Allow the distillation to proceed at a rate of 10 drops per minute.
Use separate receiving flasks for the beginning, middle, and end of the distillation to disallow low and high boiling impurities into the distillate.
Fifth, never let the distillation flask run dry. A flask that is allowed to run dry may overheat and break.
FRACTIONAL DISTILLATION
This technique should be used if you need to separate two liquids that have a small difference in boiling point-- less than 25 degrees Celsius.
Fractional distillation is more effective at separating liquids
with similar boiling points because it utilizes a fractionating column.
A fractionating column contains column packing with a large surface area and works by promoting a lot of tiny distillations on the surface of this packing.
Specifically, when the liquid mixture is heated to boiling,
the resulting vapor is richer in the lower boiling component.
The vapor moves out of the flask and condenses on the bottom few centimeters of the fractionating column.
Condensed droplet is richer in lower boiling component, and the liquid in the distilling flask is richer in the higher boiling component.
If that liquid droplet is reheated, it will vaporize and condense a little further up the fractionating column. This distillate will have an even higher percentage of the lower boiling component.
This process is repeated until the vapor reaches the top of the fractionating column, where theoretically, it should be pure in lower boiling component.
To assemble the apparatus for our fractional distillation, place a fractionating column between the distillation flask
and the distillation head. Alternatively, your lab may have all-in-one distillation glassware that contains a fractionating column.
Perform the fractional distillation in the same manner as the simple distillation. To ensure an effective fractional distillation, heat the distilling flask very slowly.
Too much heat causes the distillation to occur too rapidly, disallowing the liquid vapor equilibria on the surface of the fractionating column. If too little heat is used, then the column may lose heat faster than it can be warmed up by the vapor, preventing the vapor from reaching the top of the column.
If the column seems to be losing heat faster than it can be warmed up by the vapor, you may insulate the column by wrapping it with glass, wool, or cotton and aluminum foil.
As a general rule, a slow steady distillation, where one drop is collected every 2 to 3 seconds, is reasonable.
Distillation is an effective technique for separating impure fine liquids. When used correctly, pure contents and good yields are readily attained.
E. Vacuum Distillations
Simple distillation is an effective technique for purifying liquids, if the liquids boil below about 150 degrees Celsius.
If you have to purify a higher-boiling liquid, however, then you must perform a distillation under vacuum. The third type of distillation is a vacuum distillation. This technique must be used if the liquid boils above about 150 degrees Celsius, where it is likely to decompose.
As you know, the boiling point of a liquid occurs when it's vapor pressure isnequal to the external pressure. If a system is under vacuum, it has a reduced pressure and the liquid is able to boil at a lower temperature. To set up the apparatus for the vacuum distillation, insert a Claisen adapter between the distillation flask and head.
Liquids often boil violently under reduced pressure, and the Claisen adapter is used to decrease the probability that liquid will bump into the condenser. Instead of using a vacuum adapter, attach a cow or pig to the end of the condenser and place a receiving flask on each joint.
Because the system will be under vacuum during the distillation, you will not be able to replace the receiving flask as you did during atmospheric distillation.
A cow or pig allows you to keep the system under vacuum
but still switch to new receiving flasks. Next attach heavy-walled vacuum tubing to the outlet on the cow or pig adapter.
If the walls of the tubing are too thin, then they will collapse under vacuum. Attach the other end of the vacuum tubing
to a vacuum source, such as a vacuum pump or water aspirator. The vacuum source should also be connected
to manometer, a device that measures pressure. Finally, make sure that all joints are greased well. If they're not, solvent may get into the joints and freeze them shut under vacuum.
Apply a thin film of grease to the top of the male adapter and twist the female adapter onto it until this film of grease can be seen all around the joint.
Do not apply too much grease to the joint and never apply grease close to the bottom of the male adapter. These actions may cause the grease to seep into the distilling flask
and contaminate your liquid.
Before performing a vacuum distillation, you must check for leaks in your system.
To do this, make sure that all of stopcocks are closed
and turn on the vacuum.
Then open the stopcocks one by one, starting from the one that is closest to the vacuum source.
As each stopcock is opened, listen for a hissing noise, which implies a leak in the system.
If you find the leak,
turn off the vacuum,
introduce air into the system,
regrease the joints,
try again.
The system must be free from leaks before you can proceed.
Once you are convinced that the system is free from leaks,
fill the solvent trap with liquid nitrogen. This step is essential to prevent destruction of the vacuum pump by vaporized solvent.
Then transfer the liquid mixture into the distilling flask
and add a stir bar. Do not add boiling stones for a vacuum distillation. Boiling stones are useless because the vacuum removes the air in their pores.
Move the heating mantle up to the distilling flask and place a stir plate underneath. Do not turn on the heat.
turn on the stir plate. If stirring is not occurring during a vacuum distillation, the probability of bumping increases dramatically.
Slowly and carefully introduce the system to vacuum. You will see the solution start to boil as low boiling impurities and air run through the apparatus without heat.
After the liquid mixture has stopped boiling, turn on the heat.
When the distillation has been started you can determine the temperature at which the solution will boil under the reduced pressure conditions through the use of a nomograph.
First, find the boiling point of the compound at atmospheric pressure on line B of the nomograph.
Note the current pressure of your system from the manometer and mark its location on line C of the nomograph.
Using a ruler or straightedge, line up these two points and find the point of intersection on line A. This number should be a good estimate of your expected boiling point. Carry out the vacuum distillation as normal.
When finished, remove the heat source from the distillation flask,
Turn off the vacuum, and allow the solution to cool completely.
Then introduce air into the system,
Stop the stirring,
and remove the receiving flask.
Other things to remember when carrying out vacuum
distillations are as follows.
If you know that you have some low-boiling liquid present in your mixture, first carry out a simple distillation to collect it before attaching the vacuum.
If you must separate compounds with similar boiling points, then you can insert a fractionating column between the distillation flask and Claisen adapter. Unlike distillations at atmospheric pressure, where a narrow boiling point range is observed, it is not unusual to see a 10 to 20 degree Celsius temperature range during a vacuum distillation due to pressure changes.
Vacuum distillation allows you to purify high-boiling liquids
in a reasonable time period without having to worry about decomposition.