Transcript
GLACIERS AND GLACIATION
Evidence of Crustal Rebound
Glaciers are powerful forces of erosion and deposition on Earth’s surface, and the great ice sheets were sufficiently massive to greatly depress Earth’s lithosphere. When the ice sheets melt, the tremendous load on the lithosphere is removed and a long, slow process of uplift known as ‘crustal rebound’ ensues. In this exercise, you will use Google Earth to identify features associated with crustal rebound following the last glaciation.
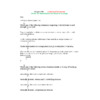
Fig. 1. Google Earth image of strand lines (beach ridges) on the southern shore of Hudson Bay, Canada.
In Google Earth, enter the coordinates below into the query bar:
56.875725 -89.309100 Altitude = 20 km South shore of Hudson Bay, Canada.
The parallel streaks in this image are strand lines or beach ridges along the shore of Hudson Bay, Canada. Following glaciation, the land surface south and west of the ice center began to tilt upward as a result of crustal rebound. Upward tilting of land to the south caused the west, south, and east shores of Hudson Bay to tilt upward as well. As this happened, the shore progressively retreated, leaving behind distinct beach ridges or strandlines around the margins of the bay. At this location, post-glacial rebound has uplifted the land surface over 200 meters during the last 8,000 years or so. Though the rate of rebound has slowed considerably, this process is ongoing today.
You will use the ‘Measure’ tool, create a topographic profile perpendicular to the shore and ending at an elevation of 30 m.
To construct a topographic profile, begin by enabling the metric measures in Google Earth. This is accomplished by clicking on ‘Tools’ on the menu bar at the top of the page, the clicking on ‘Options’. When the ‘Options’ dialogue opens, you will see in the lower left of the dialogue an ‘Elevation’ option. Choose Meters, Kilometers, then ‘Apply Settings’.
Next, you should start up the Microsoft Excel program as you will be entering data generated from Google Earth into this spreadsheet. When the spreadsheet opens, label one column ‘Distance (m)’ and one column ‘Elevation (m)’.
Next, return to the Google Earth window and enable the ‘Measure’ tool by clicking on the word ‘Measure’ (or simultaneously using ‘ctrl + 6’ keys on your keyboard). When the ‘Measure’ dialogue box appears, use the drop down window to choose meters as the units of distance. Also select the tab labeled ‘Path’.
Note that the ‘Measure’ icon on your image appears as a box with tick marks along the mid-points. Add new points to your profile by simply moving the cursor to a new location and clicking again. If you add a point and want to delete it, simply right click on your mouse and it will disappear.
You can determine the approximate spacing to each point by noting the cumulative distance along your profile and entering this distance at each point into the spreadsheet.
To begin your topographic profile, find a mountainous region of the world. Note your location and write it down so others will know where you are. Zoom in until you can see details of surface features. Then click any point on your image using the ‘measure’ cursor. Move the ‘Measure’ cursor until the point is centered (a pointing finger icon will appear), and you will be able to read the elevation (“elev”) of the point along the bottom of the image window.
For this topographic profile, create a new point along your transect at each strand line that you can see in the image. Continue until you have reached an elevation of 30 m.
To plot this topographic profile in Excel, choose the ‘Chart’ function from the ‘Insert’ menu at the top of the screen.
For ‘Chart Type’, choose, ‘XY (Scatter)’. Choose the scatter plot option ‘Scatter with data points connected by lines’. Make the ‘DISTANCE’ column the X-axis and ‘ELEVATION’ column the Y-Axis of your plot.
Plot your topographic profile using Microsoft Excel.
Note that the plotted topography is approximately linear (within the error associated with our plotting tools). If you assume the strand line at the 30-m elevation is approximately 3,000 years old, what is the annual rate of rebound at this site? ca. 0.01 m per year
LINKS TO RELATED SITES:
Wikipedia entry on Post-Glacial Rebound: http://en.wikipedia.org/wiki/Post-glacial_rebound
Post-Glacial Rebound Map: http://atlas.nrcan.gc.ca/site/english/maps/archives/4thedition/environment/land/035_36
Wikipedia entry on Hudson Bay: http://en.wikipedia.org/wiki/Hudson_bay
Current Rebound Rates: http://www.unavco.org/research_science/science_highlights/glacial_rebound/glacial_rebound.html
Isostasy and Rebound: http://www.homepage.montana.edu/~geol445/hyperglac/isostasy1/